This pieced hot pad project is perfect to keep in your arsenal in case you ever find yourself needing a last minute gift. Only have a short amount of time before you need to go to a party and realize you didn’t pick up a hostess gift? Instead of stopping by the grocery store to pick up a plant, toss this project together for a more personal gift!
Although it was created for a serger, you can alter this project just a bit to make it on a sewing machine.
Materials:
- Four spools of Madeira® Aerolock thread to match fabrics
- Two spools of Madeira® Decora 6 (decorative thread) to complement fabrics
- One spool of Madeira® Aerofil Polyester sewing thread
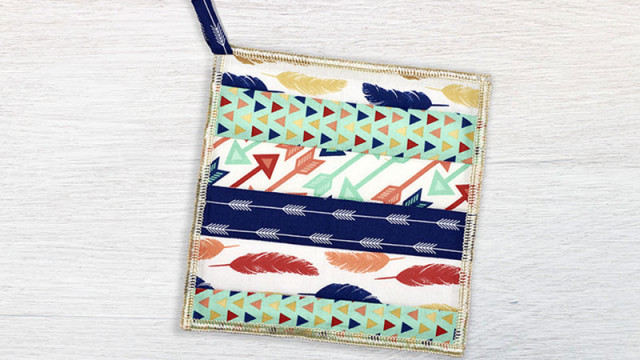
- Six 2” x 10” strips of several different fabrics
- One 9” square of fabric for the backing
- One 1.75” x 6” strip for the hot pad loop
- Two 9” squares of Insul-Bright insulated lining/batting
- Large-eye needle
Tools:
- Serger
- Serger Clear Foot
- Sewing machine
- Optional: walking foot is helpful when quilting
Steps:
- Set your serger up for a 4-Thread Overlock stitch with a 2.5mm stitch length and the smallest width (for a ¼” seam allowance) with serger thread.
- Line up your 2” strips in the order that you want. Place the first 2 (pretty sides) together and run them through your serger next to the blade, not clipping any fabric.
- Press your seam towards the darker fabric and continue stitching the next strip to the previous one until all 6 strips are serged together. Square up your fabric to 9” x 9”.
-
Change your serger stitch width to the widest width. Layer the two layers of Insul-bright together and serge around the entire square, cutting off 1/8” from each edge.
- Stitching the Insul-Bright together will make it easier later and will also allow the serger stitch and fabric to completely conceal the Insul-Bright batting.
- I also put a couple sewing machine basting stitches throughout the middle of the 2 layers of the Insul-Bright to hold them together.
-
Take your 6” strip and fold pretty sides together along the length of the strip. Serge the long raw edges together.
- Then turn right-side-out with a skinny loop turner and press.
-
Layer your backing, your Insul-Bright and your topping. Using a sewing machine, with your needle in the center position (and a walking foot if desired).
- Stitch in the ditch along the seams of the quilt-pieced top. Then, stitch ¼” from the edge and around the perimeter of the square to hold everything in place.
-
Using the same 4-Thread Overlock stitch with the widest stitch width and 2.5mm-3mm stitch length, place your Madeira Decora 6 spools in the Upper and Lower Loopers.
- You may need to use a thread cradle for these thicker threads to pass through the loopers. Stitch out on some test fabric before stitching on your project.
- When using decorative threads on a serger, slow down and take your time. If you are having trouble with the quality of the stitch, you may need to adjust and loosen the looper tensions.
- Serge three sides, the right side first, then the bottom, followed by the left side of the hot pad, saving the top side for last and leaving long thread tails at the beginning of each.
-
On the final side, take the hot pad loop and place the right side down on the top left corner (aligning raw edges) and stitch with your sewing machine about ¼” in.
- Then, loop the other side of the loop down and around to the back (right side of loop facing right side of backing, not twisted).
- You may need to adjust the loop to the size you like by pinning it and flipping it up to see if you like it.
- Once you have the loop size that you desire, flip the loop back down, right sides together and lined up where the front part of the loop is stitched and sew in place.
- Without clipping your loop, serge along your fourth and final side of your hot pad, leaving a long thread tail at the beginning and end of this serge.
-
Take a large-eyed needle and thread your serger tails into the serger stitch (tunnel through the backside of the stitch) on the hot pad about 1-1.5” and cut off excess.
- This will lock your serger ends into place without causing any fraying of your thread.
- And finally, flip your loop up and you’re done!
This pieced hot pad project was originally found on the Baby Lock website. To view the original project, please click here. This project was created by Stephanie Struckmann for Baby Lock.