With so many states starting to ban plastic shopping bags, we thought it might be a fun project to learn how to make our own reusable grocery bags! There are tons of different patterns and designs out there, some a little trickier than others, but we found one that is both easy to follow and super cute!
Continue reading…Keiki Mask Drive
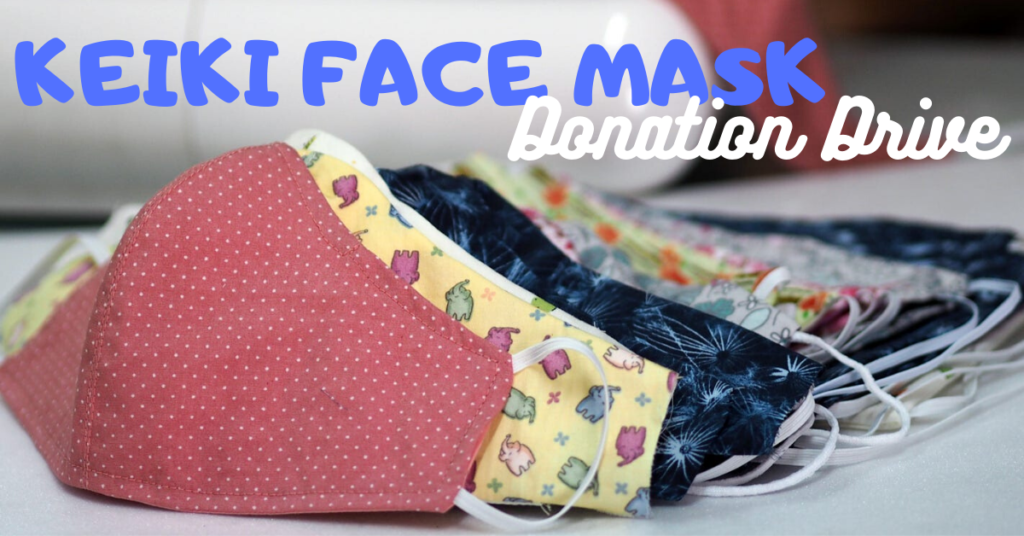
As the new school year looms closer, parents, guardians, and teachers have begun to start thinking of how the current pandemic will impact classrooms. There is an increased need for keiki (child) sized face masks as many kids have been cooped up at home or at a close family friend or relative’s house since their last day at school.
Throughout the month of August and into September, Discount Fabric Warehouse will be collecting keiki face masks for donation to schools across the state. For the Big Island, the Friends of the Children’s Justice Center as well as representatives from various schools will be handling distribution. We are currently still working on finding contacts on the other islands to assist with getting the masks where they are needed.
Continue reading…Fabric Face Masks
One of the many ways you can help is to make fabric face masks. We all have fabric stashes at home that we can break into or even that scrap basket. Many of the mask patterns out there don’t call for very much fabric and are a quick sew. We’ve collected some patterns and tutorials for you here to get you started. However, if you are planning on sewing masks for a specific organization, you may want to check with them ahead of time to ensure that you are meeting their specifications.
Continue reading…
Beach Towel Bag
Summer is approaching and the Friends of the Children’s Justice Center is asking for help to make this summer a memorable one for their young clients. This year we are creating draw string beach towel bags that are perfect for the pool or the beach. This beach towel bag is a great project to make year-round in Hawaii.
How You Can Help
Instructions for this project are coming soon. You’ll need a towel (a standard bath towel works fine and comes in a variety of colors to match your fabric), some cotton fabric, and a bit of time since this can be a bit of a confusing project at first. This project is a great project to use with larger scraps since it doesn’t take a ton of fabric, but can also help you go through your stash.
Check back soon for instructions on how to make this fun project. We’ll also be updating with a special offer for all of you who donate a completed bag to one of our stores.
The Pillow Case Project
One of our favorite quick projects and stash busters are pillow cases. They’re an easy project that sewists of any age and skill level can help with! Perfect for a summer project!
Our stores are collecting homemade pillow cases for donation to organizations that help those in need in our communities. We are asking for help to make these pillow cases so that we can reach as many people as possible.
There are so many ways that you can help! We appreciate any time and effort that you are able to give to help us help others in our communities!
Continue reading…
Project Linus
We love giving back to our community. One of the ways we do this is through our Charity Sewing Projects that we do throughout the year. One of the organizations that we collect completed projects for year-round is Project Linus. Learn more about the organization and how you can help on this page!
Continue reading…
Aloha Bags of Hope
When children are entering foster care or are transitioning from one home to another, they are usually given a trash bag to put their belongings in. According to the Friends of the Children’s Justice Center of East Hawaii, children are taken from their homes and placed into foster care for their immediate safety, at no fault of their own, and often remain in care until they become adults. They frequently change foster homes, and when moving, take none of their belongings, or the little that they have is placed into trash bags. Already experiencing sadness, trauma, and anxiety, children relate themselves to trash, like their belongings that are so frequently thrown into trash bags. Jade, a former foster youth, shared that it was hurtful and “it made me feel like I was the trash being carried around”. Kekoa, another former foster youth, agreed with Jade, and supports the idea of every foster child having their own duffel bag. Kekoa stated ”it’s the little things that make the biggest difference.”
Discount Fabric Warehouse has made it a mission to show these children that they’re worth more than just a trash bag. Throughout the year, we encourage folks to make duffle bags and bring them in for donation to organizations that help foster children.
Continue reading…Holiday Projects – 2019
Looking for some easy sewing projects that can be done in no time? You’ve come to the right place! While we love intricate detailed projects, sometimes you just need to get something done quickly so you can give it as a gift. Here are some Holiday Projects to get you started!
Continue reading…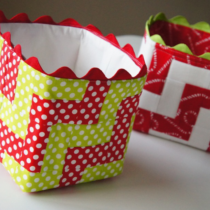
Festive Fabric Baskets
Who doesn’t need a festive fabric basket? These adorable baskets can be used to create a fun gift basket or to use as decoration throughout your home during the holiday season! Or, just change up the fabrics and make them to use all year-round!
This festive fabric basket project was originally found on the Husqvarna Viking website and the project sheet can be downloaded here. (We didn’t include the project in the text of this site at this time because of the diagrams that were included.)
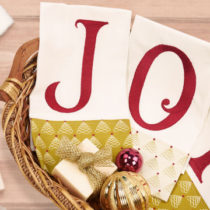
Monogrammed Holiday Towels
Monogrammed holiday towels are a great way to personalize your holiday gifts! These towels are quick and easy to put together! Spell names or even your favorite holiday words and have a fun and functional gift in no time!
This project was originally designed to do on the Baby Lock Destiny II but you can alter it to use practically any embroidery machine.
Materials:
- Flour sack towels 24” x 38”
- Christmas colored fat quarters
- Madeira ® sewing and embroidery thread
- Tear – Away Stabilizer
- Baby Lock Positioning Stickers
Tools:
- Baby Lock ® Destiny II Sewing and Embroidery Machine
Steps:
- From the flour sack towels, cut three pieces that measure 18” x 24”.
- Set up the machine for sewing.
- Hem the two long sides and one short end. Fold the ends in ¼” and press. Fold in again ¼” and press. Top stitch close to the edge on all three edges. Set the stitch length to 3.00.
- Repeat for the other two towels.
- From the three Christmas fat quarter fabrics , cut three sections that measure 18” x 8 ½” . Turn under ½” on one of the 18” edges and press.
- With right sides together, place the unfolded edge on the Christmas fabric to the unhemmed flour sack towel edge.
- Sew the two together using a ½” seam allowance.
- Press the seam toward the Christmas print fabric. Fold the opposite edge of the Christmas fabric to the back side with the folded edge even with the seam line.
- Pin in place.
- Top stitch on the right side of the towel.
- To determine the placement for the letters, measure 3 ½” up from the top edge of the flour sack fabric and place a Baby Lock Positioning Sticker.
- Set the machine up for embroidery. Hoop the tear-away stabilizer in the 200mm x 200mm along with the towel. Center the cross-mark on the Position Sticker in the center of the hoop.
- Click on the letter that you wish to embroider on the towel. These letters are about 6 ” tall. In the sample, the word “JOY” was used.
- To ensure the design is centered, in the Edit field click on the Positioning icon. The machine will scan the area inside the hoop and position the letter so that it lines up the sticker.
- Embroider the letter. Remove the towel from the hoop. Repeat for the remaining towels.
This monogrammed holiday towel project was originally found on the Baby Lock website. To view the original project, please click here. The project was created by Diane Kron for Baby Lock.